See [Logging in with Microsoft 365](https://helpdesk.brynathyn.edu/books/accounts/page/logging-in-with-microsoft-365 "Logging in with Microsoft 365") if you need help with this step.
3. Select **Web Print** on the sidebar. [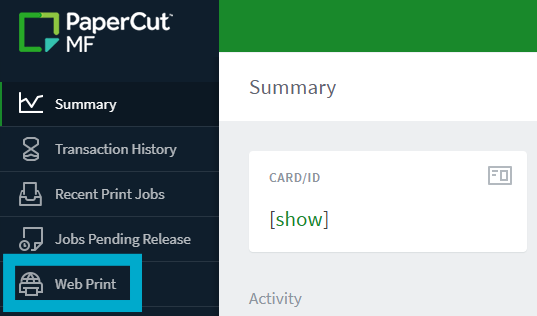](https://helpdesk.brynathyn.edu/uploads/images/gallery/2026-06/zRzimage.png) 4. Click **Submit a Job**. [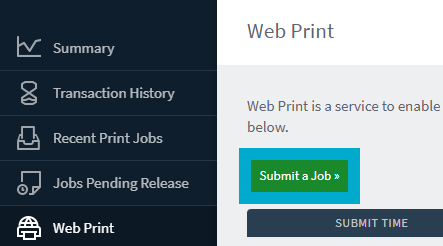](https://helpdesk.brynathyn.edu/uploads/images/gallery/2026-06/d5Limage.png) 5. Confirm the number of copies to print, then click **Upload Documents**. [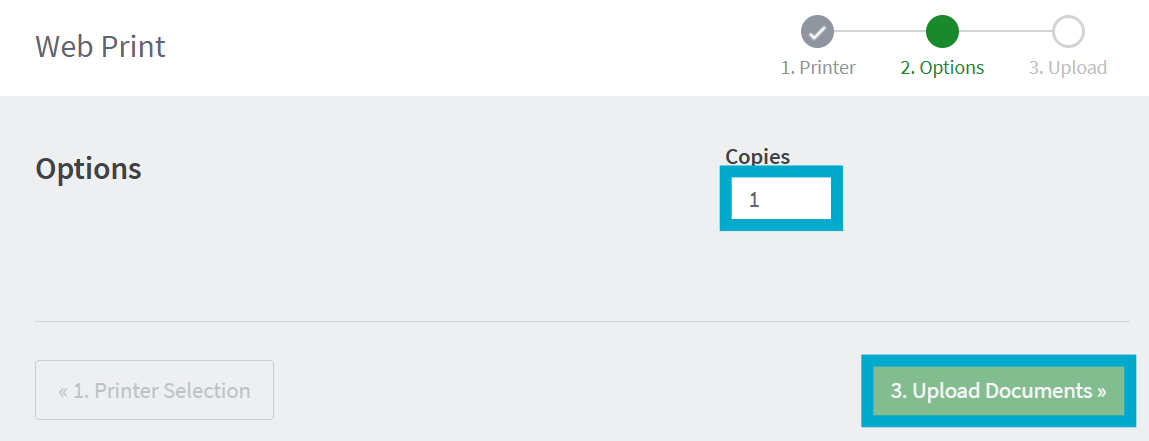](https://helpdesk.brynathyn.edu/uploads/images/gallery/2026-06/0i4image.png) 6. Select **Upload from computer** and upload the file(s) you wish to print or simply drag and drop files onto the **Drag files here** box. [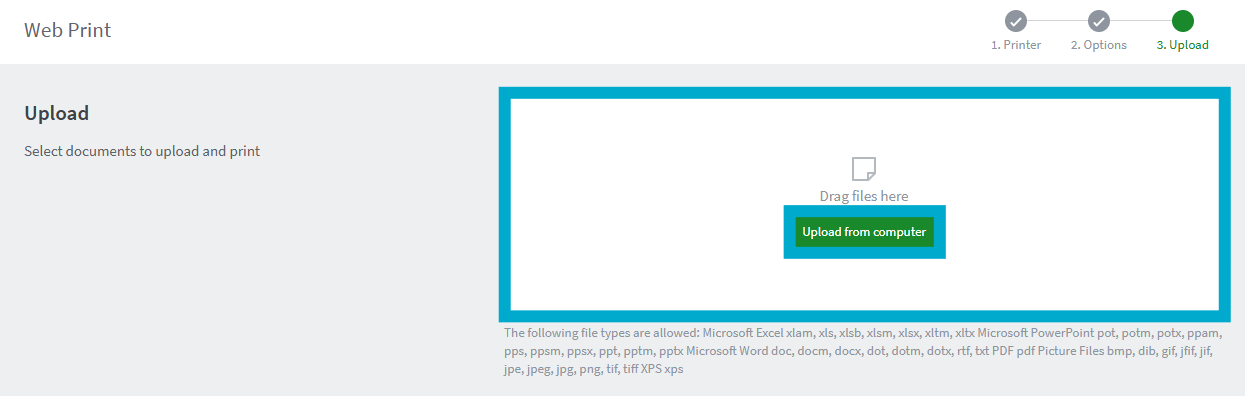](https://helpdesk.brynathyn.edu/uploads/images/gallery/2026-06/NpSimage.png) 7. After your files are uploaded, click **Upload & Complete** to print them. [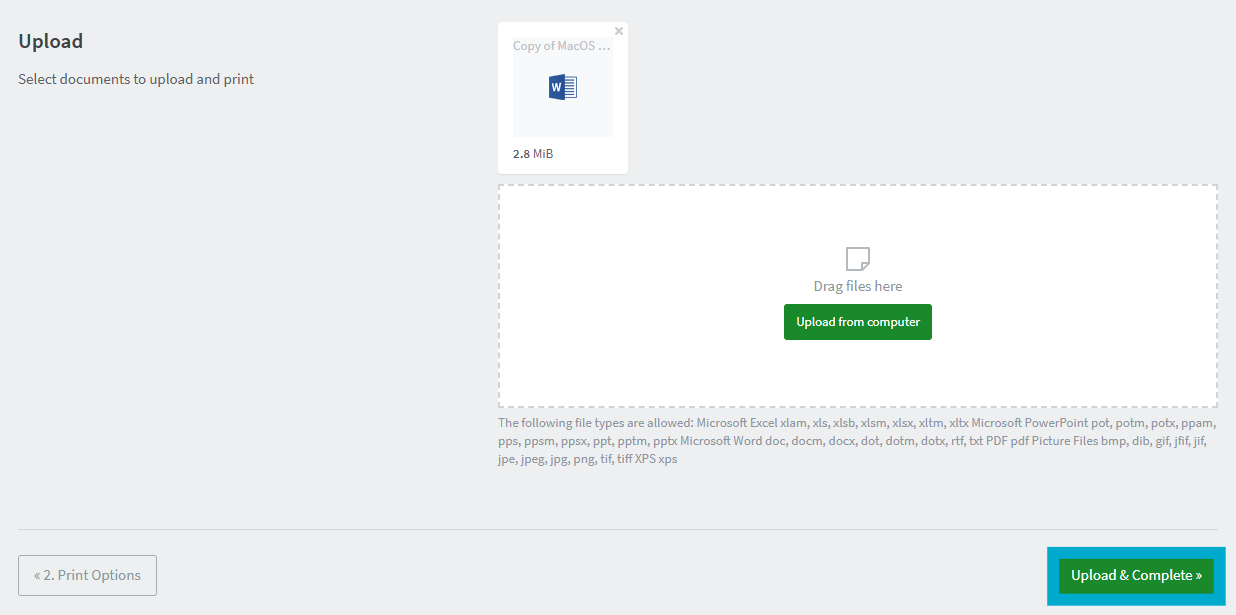](https://helpdesk.brynathyn.edu/uploads/images/gallery/2026-06/rtKimage.png) 8. Once the status says **Held in a queue**, your print is ready to be released at the printer. [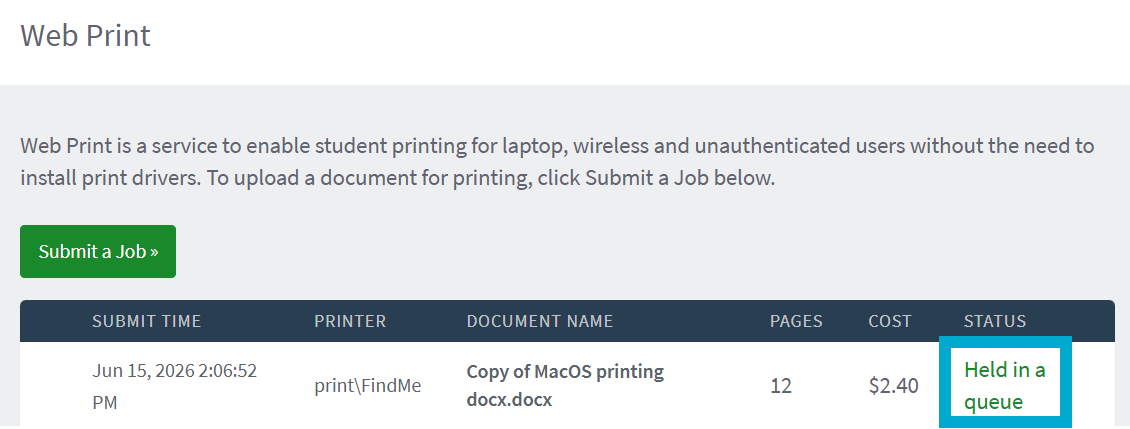](https://helpdesk.brynathyn.edu/uploads/images/gallery/2026-06/32aimage.png) 9. Go to one of the copiers to release the print there. 1. If you have your Bryn Athyn College ID card, scan it at the copier to release the print. 2. If you don’t have your ID card, you can use the pin found on the PaperCut dashboard and enter that manually at the printer. [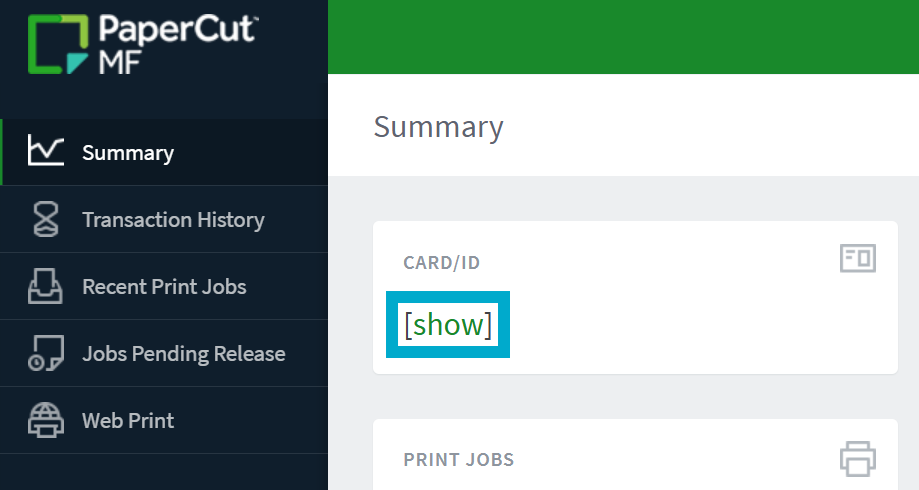](https://helpdesk.brynathyn.edu/uploads/images/gallery/2026-06/jirimage.png) 3. Additionally, all students should have received an email with their PaperCut ID. # Direct Printing Faculty and Staff can connect to the copiers directly. The instructions for doing so on Windows and MacOS are below.If prompted for a username and password, use your network credentials. If you don't remember what your campus credentials are, see [What is my Username and Password?](https://helpdesk.brynathyn.edu/books/accounts/page/what-is-my-username-and-password "What is my Username and Password?")
3. Find the printer you’d like to connect to in the window that appears, then **right click** on it and click **Connect…** [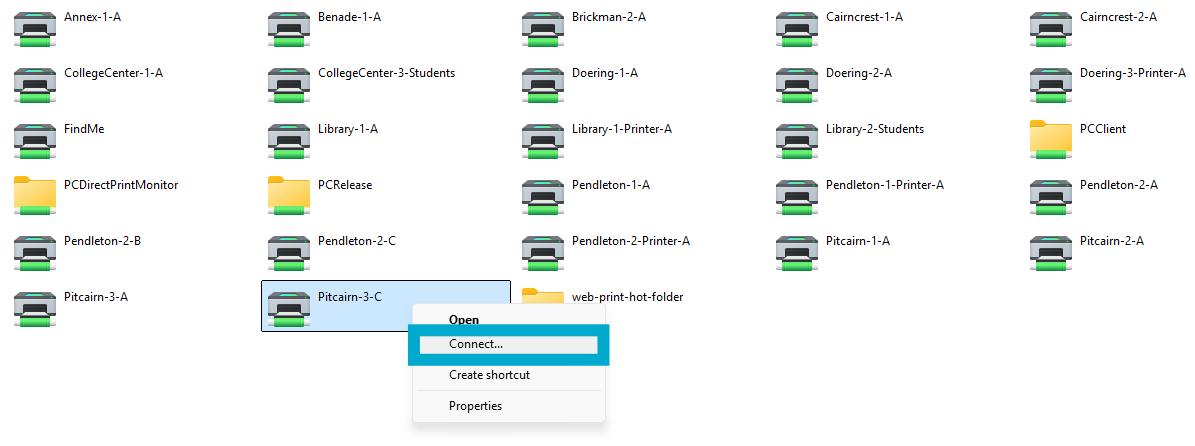](https://helpdesk.brynathyn.edu/uploads/images/gallery/2026-06/1aeimage.png) - The printer should connect and automatically install the appropriate drivers. 4. Check that the printer is set up correctly by: 1. Going to **Settings** > **Bluetooth & devices** > **Printers & scanners** and looking for the chosen copier. [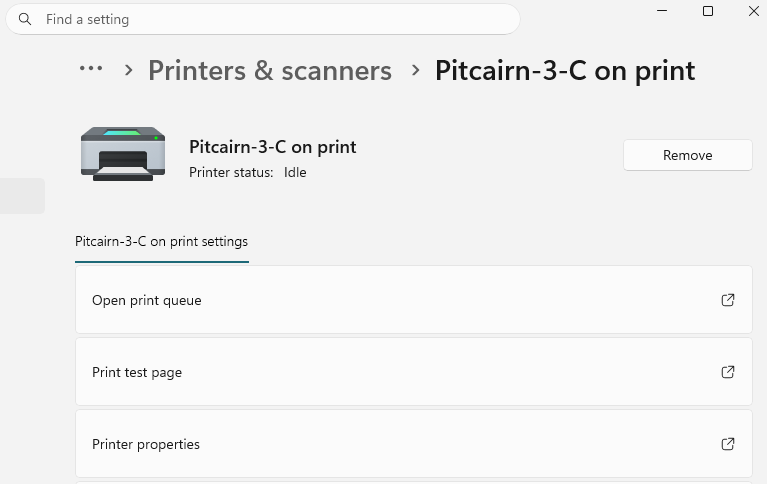](https://helpdesk.brynathyn.edu/uploads/images/gallery/2026-06/2yyimage.png) 2. Doing a test print from software like Notepad, Word, etc.If the **Advanced** icon does not appear, right click on the toolbar at the top near the icons, click **Customize Toolbar…** then drag the **Advanced** icon from the pop-up window onto the toolbar. Click **Done**.
8. In the **URL:** box, enter `smb://print/` and then the name of the printer (e.g. `smb://print/Pitcairn-1-A`). [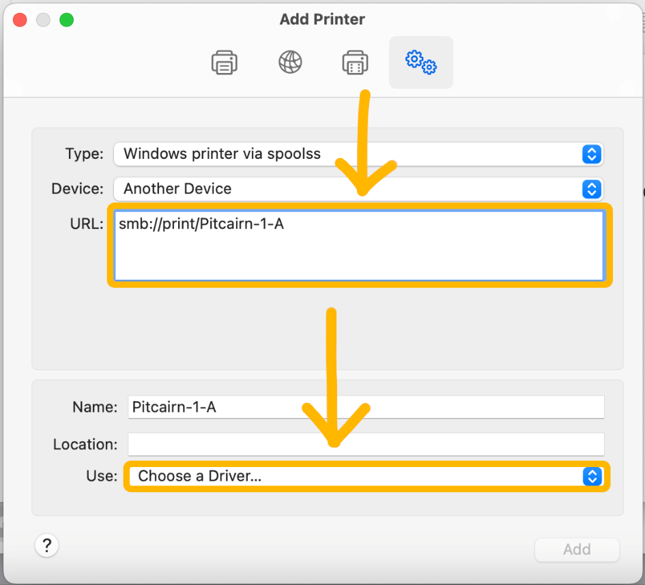](https://helpdesk.brynathyn.edu/uploads/images/gallery/2026-06/ZKMimage.png) 9. On the **Use:** drop-down menu, select **Choose a Driver…** 1. See the table below for complete list of names:| Printer Name | Model Number | Location |
|---|---|---|
| Annex-1-A | Sharp 70C36 | 1st Floor |
| Benade-1-A | Sharp 70C36 | CPO |
| Brickman-2-A | Sharp 70C45 | Admissions 2nd Floor |
| Cairncrest-1-A | Sharp 70C45 | Entrance |
| Cairncrest-2-A | Sharp 50C26 | 2nd Floor |
| CollegeCenter-1-A | Sharp B540WR | Health Center, 1st floor |
| CollegeCenter-3-Students | Sharp 50C26 | 3rd Floor Students |
| Doering-1-A | Sharp 70C36 | 1st Floor |
| Doering-2-A | Sharp 70C45 | 2nd Floor |
| Library-1-A | Sharp 50C26 | Archives |
| Library-2-Students | Sharp 70C36 | Main Floor |
| Pendleton-1-A | Sharp 70C36 | 1st Floor |
| Pendleton-2-A | Sharp 70C36 | 2nd Floor Faculty |
| Pendleton-2-B | Sharp 50C26 | Theological |
| Pendleton-2-C | Sharp 50C26 | College Office |
| Pitcairn-1-A | Sharp 70C36 | Lower Level |
| Pitcairn-2-A | Sharp B540WR | 2nd Floor - Finance |
| Pitcairn-3-A | Sharp B540WR | Top Floor |
| Pitcairn-3-C | Sharp B540WR | Advancement Office |
If you don't remember what to enter here, see [What is my Username and Password?](https://helpdesk.brynathyn.edu/books/accounts/page/what-is-my-username-and-password "What is my Username and Password?")
13. To set up punching and stapling, change **Output Tray Options:** to **Inner Finisher** and **Punch Module** to **3 Holes** if the options appear. Otherwise, leave the default settings. [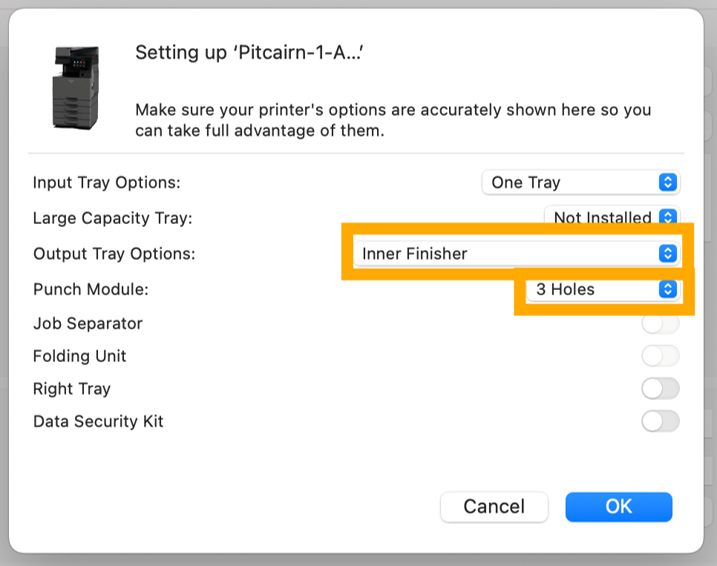](https://helpdesk.brynathyn.edu/uploads/images/gallery/2026-06/axzimage.png) 14. Click **OK** on the setup pop-up box. [](https://helpdesk.brynathyn.edu/uploads/images/gallery/2026-06/5NVimage.png) 15. You can confirm the printer has been added by going back to **Printers & Scanners**. [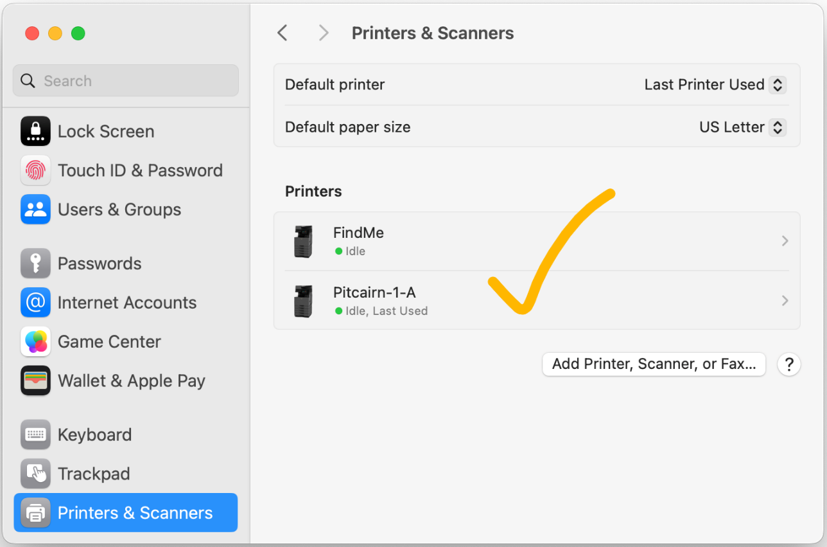](https://helpdesk.brynathyn.edu/uploads/images/gallery/2026-06/K8Kimage.png) 16. Make sure to select the preferred printer from the **Printer** drop-down menu when printing your next document. [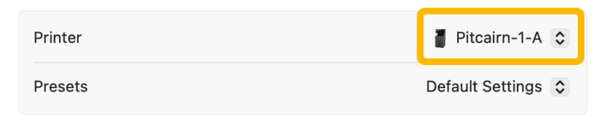](https://helpdesk.brynathyn.edu/uploads/images/gallery/2026-06/KBoimage.png)Make sure to authenticate with any prompts that appear during installation and allow the program to make changes to your PC when prompted.
4. After it finishes installing, a click **Sign in with Microsoft** in the pop-up box. [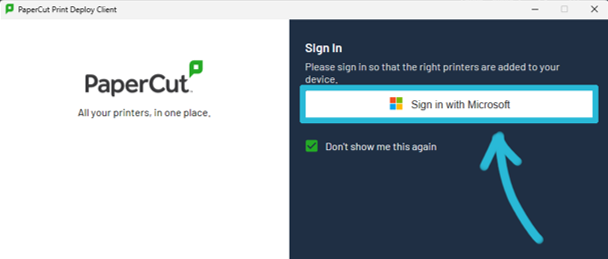](https://helpdesk.brynathyn.edu/uploads/images/gallery/2026-06/orbimage.png) 5. After you’ve signed in with your Microsoft 365 account, Print Deploy should look like this. [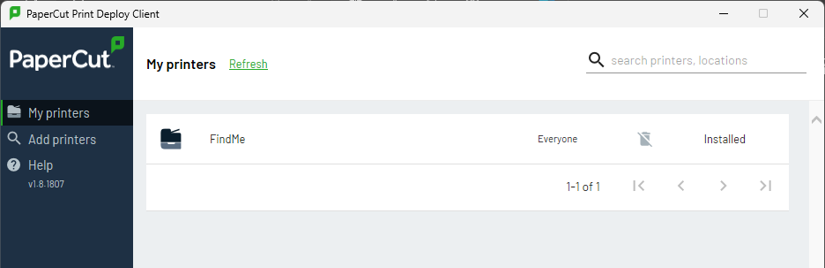](https://helpdesk.brynathyn.edu/uploads/images/gallery/2026-06/TxDimage.png) 1. Ensure that FindMe says **Installed** on the righthand side.You can now close the window and Print Deploy will run in the background.
6. When printing a document, select **FindMe** and print to it. You can then go to one of the campus copiers and release the print there. 1. If you have your Bryn Athyn College ID card, scan it to release the print. 2. If you don’t have your ID card, you can use the pin found on the PaperCut dashboard and enter that manually at the printer.Make sure to allow any permissions requests and to authenticate when prompted.
5. Once the installation is complete, click **Sign in with Microsoft** in the pop-up box. [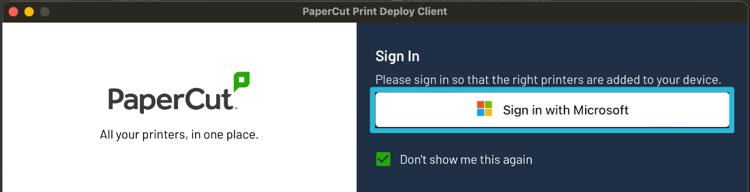](https://helpdesk.brynathyn.edu/uploads/images/gallery/2026-06/f0aimage.png) 6. After the installation is finished, Print Deploy should look like this. [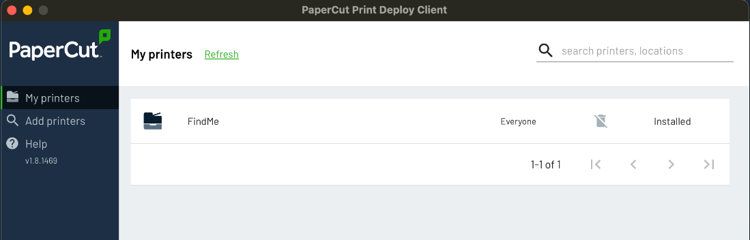](https://helpdesk.brynathyn.edu/uploads/images/gallery/2026-06/WJmimage.png) 1. Ensure that FindMe says **Installed** on the righthand side.You can now close Print Deploy, and it will run in the background.
7. When printing from the software of your choice, select **FindMe** and print to it. You can then go to any of the campus copiers and release the print there with your ID card or PaperCut ID. [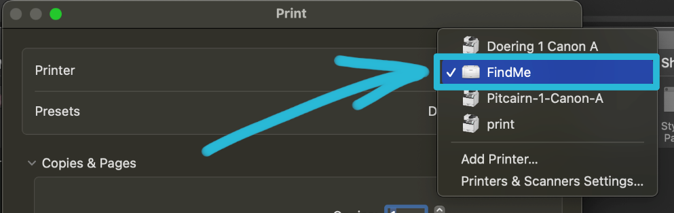](https://helpdesk.brynathyn.edu/uploads/images/gallery/2026-06/YPWimage.png)This part of the process is only relevant if this is your first time scanning on the campus copiers. If you have already done this, jump to [Scanning](#header-0f70 "Scanning") or [Copying](#header-5531 "Copying").
1. Scan your ID on the copier's card scanner. 1. This should prompt the following menu to appear on the screen: [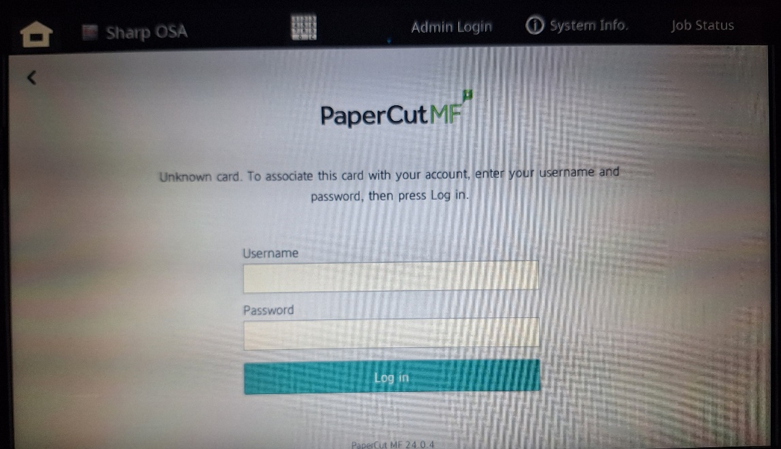](https://helpdesk.brynathyn.edu/uploads/images/gallery/2026-06/zR6image.png) 2. Enter the following credentials: - **Username**: `Most copiers have a pull-out physical keyboard, which can be useful for this step. For help, see [What is my Username and Password?](https://helpdesk.brynathyn.edu/books/accounts/page/what-is-my-username-and-password "What is my Username and Password?")
- Once you have entered your login information a red notification will pop up under the log in button, which means you have entered your login information correctly. [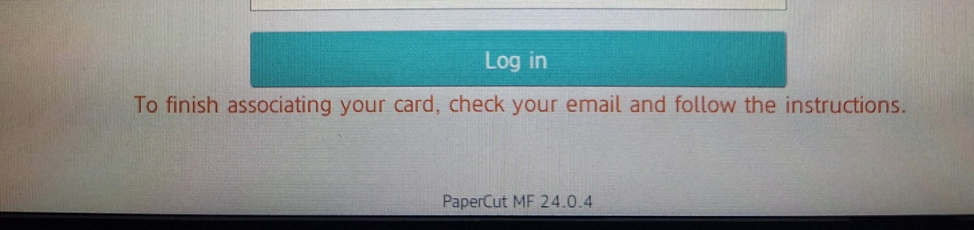](https://helpdesk.brynathyn.edu/uploads/images/gallery/2026-06/BBJimage.png) 3. Look for an email from **bac.noreply@brynathyn.edu** to your BAC address containing instructions on how to finish associating your card with the copiers. Follow the steps provided.If you don’t see the email, make sure you check your junk/trash folder.
Now that you have associated your card, you can scan or copy using the campus copiers.
## Scanning 1. Place the pages you wish to scan in the top tray of the copier, **face up**. 2. Scan your ID card on the copier's card scanner.If you have already associated your ID and it says **Unknown card**, try scanning again slowly.
3. Press **Scan** on the menu that appears on the screen. [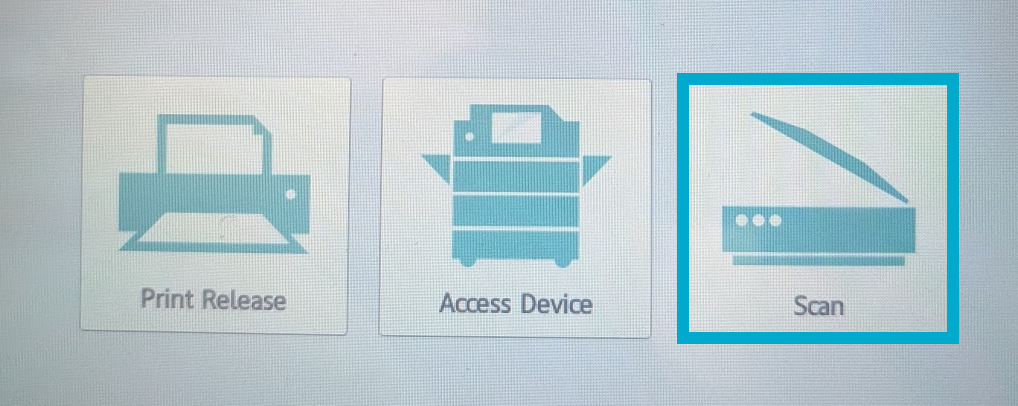](https://helpdesk.brynathyn.edu/uploads/images/gallery/2026-06/N9simage.png) 4. Chose an option to scan to: 1. **Scan to My Email** will automatically fill in your BAC Email address. 2. **Scan to Email** will allow you to enter any email address to send the scanned document to.Press **Start** to begin. You will be sent a PDF of your scan from bac.noreply@brynathyn.edu.
## Copying 1. Place the pages you wish to copy in the top tray of the copier, **face up**. 2. Scan your ID card on the copier's card scanner. 3. Press **Access Device**. [](https://helpdesk.brynathyn.edu/uploads/images/gallery/2026-06/2uzimage.png) 4. Press **Copy**. [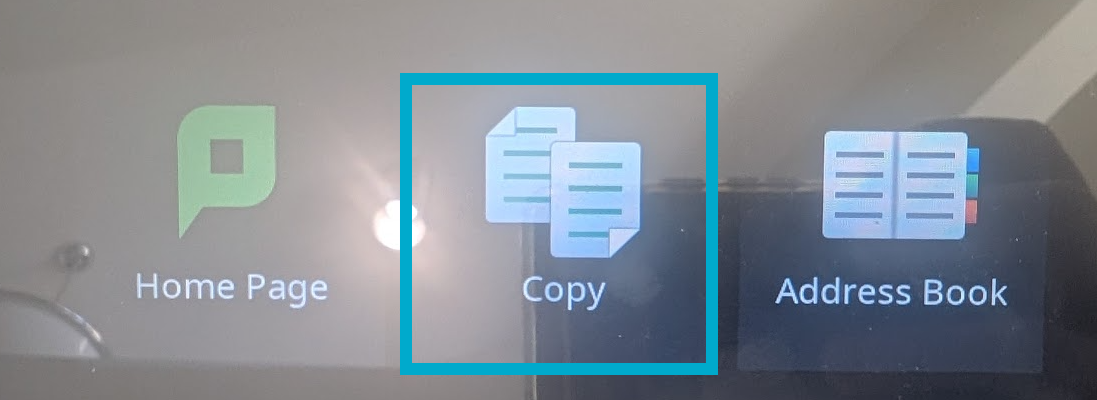](https://helpdesk.brynathyn.edu/uploads/images/gallery/2026-06/vyCimage.png) 5. Select the number of copies you want and adjust the settings for copying as desired in the menu that appears. [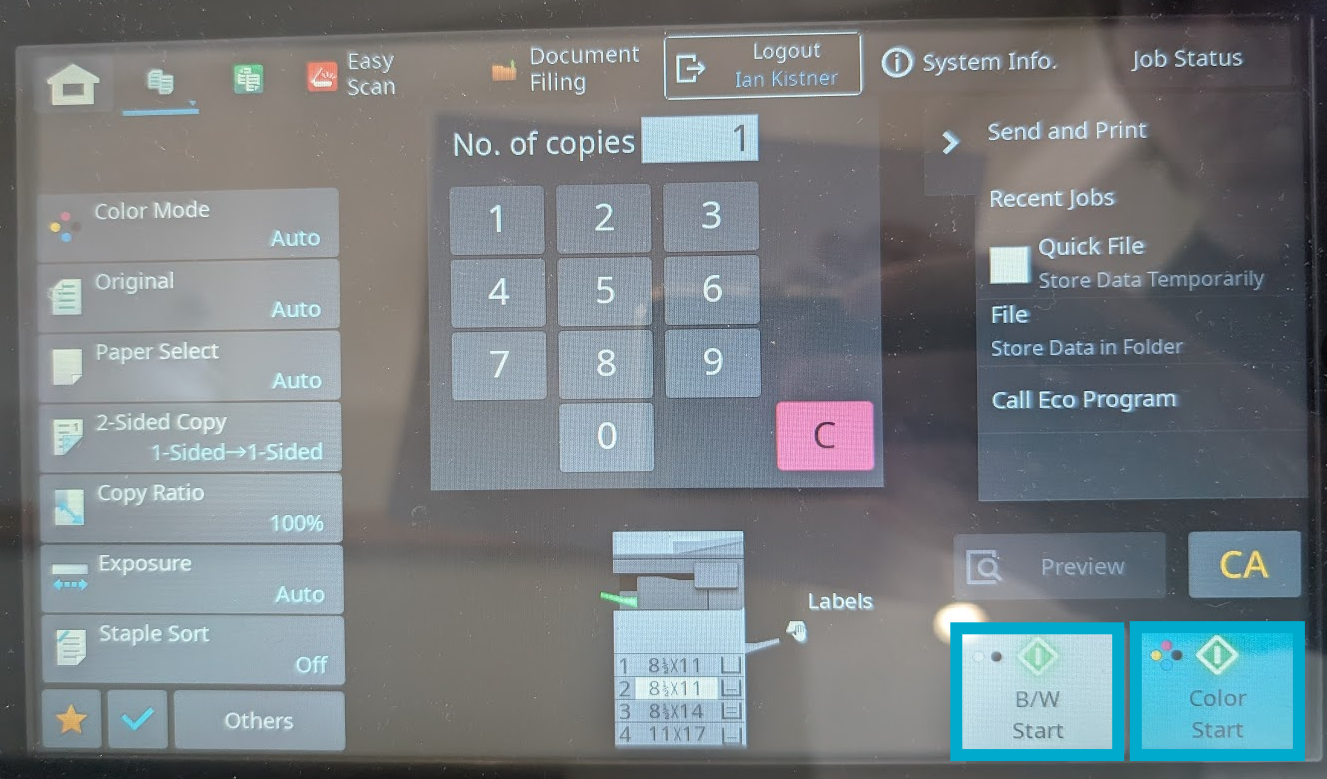](https://helpdesk.brynathyn.edu/uploads/images/gallery/2026-06/2GAimage.png) 6. Press either **Black/White Start** or **Color Start** to begin the copying job.The copier will spit out the original pages it is processing immediately, then will begin printing the copies after a brief delay.
# Printing on Non-Standard Paper The **bypass tray** on a copier is an optional side tray that can be used for feeding abnormal paper, such as envelopes, glossy paper, or weighted paper. To use the bypass tray correctly, you will need to start at the physical copier before doing anything on your computer. 1. Sign into the copier by scanning your ID card or entering your pin code. 2. Press **Access Device**. [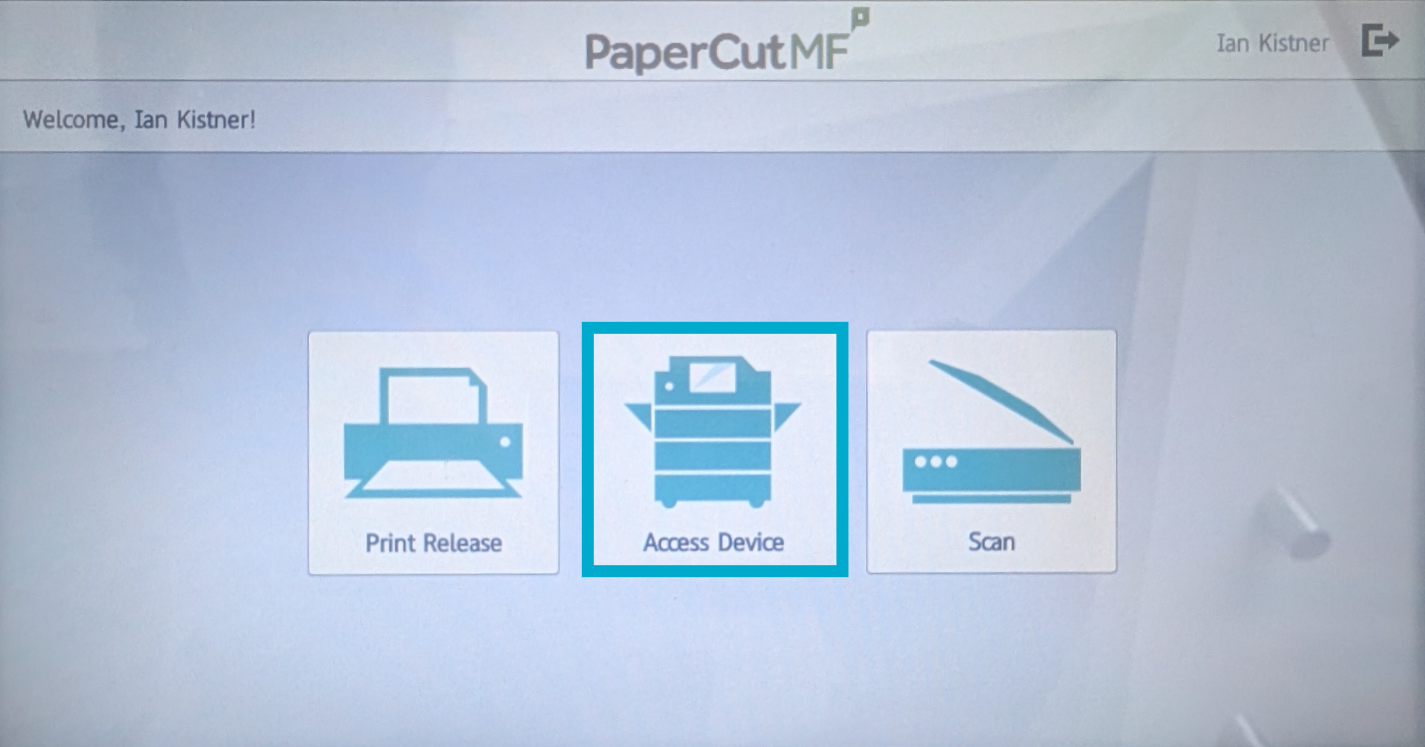](https://helpdesk.brynathyn.edu/uploads/images/gallery/2026-06/HVhimage.png) 3. Open the bypass tray and insert the paper you wish to print to. 1. Make sure that you adjust the paper guides to line the paper up and keep it secure. 2. Once your paper is in the bypass tray you should see a pop-up window on the copier display. This will display whatever the last selected options for the bypass tray were. [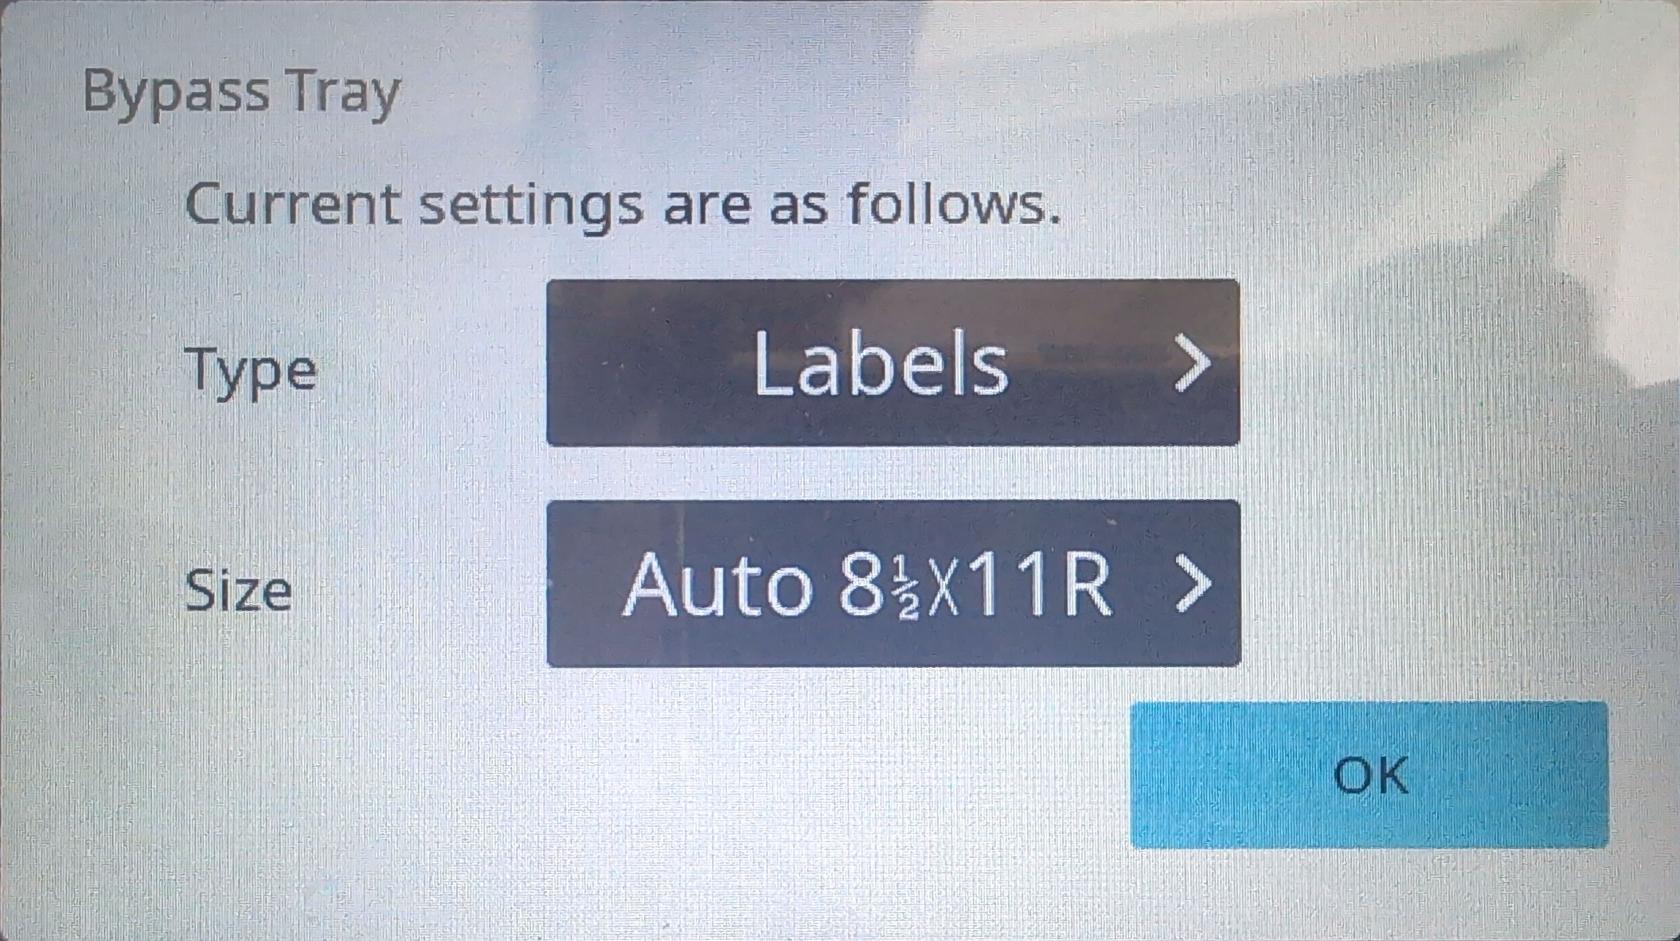](https://helpdesk.brynathyn.edu/uploads/images/gallery/2026-06/scanned-20260612-1223.jpg) 4. If the displayed settings are correct, press **OK**.Formatting issues may arise if the document format being submitted does not align with the settings configured on the copier when paper is loaded into the bypass tray.
1. If you need to adjust the type or size setting, use the touchscreen to select each and adjust as needed. 2. When selecting the size, you can usually select **auto-inch** and use the physical paper guides on the bypass tray for the copier to recognize the size. Otherwise, enter it manually. 5. Sign out of the copier. 6. Open the document you need to print on your computer.The attached screenshots are of printing from Word. If you're printing from a non-Microsoft product, getting to the print menu may be slightly different, but the printer properties will look the same.
7. Go to the **Print** menu for the software you are printing from. 8. Select the **Printer Properties** link underneath the printer selection dropdown. [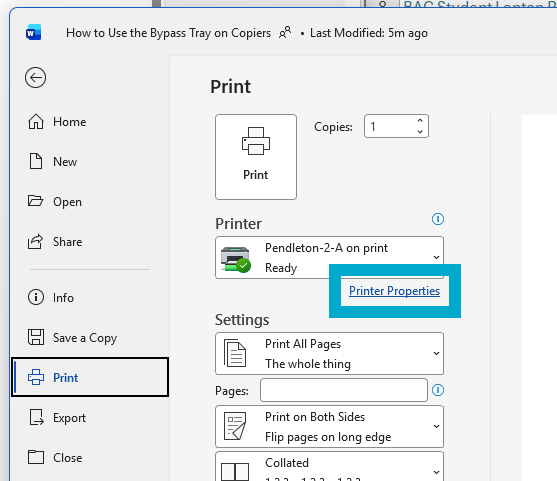](https://helpdesk.brynathyn.edu/uploads/images/gallery/2026-06/YTVimage.png) 9. Click the **Paper Source** tab in the window that appears. [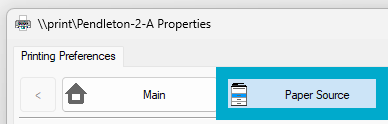](https://helpdesk.brynathyn.edu/uploads/images/gallery/2026-06/gJGimage.png) 10. Select the **Paper Tray** drop down menu. [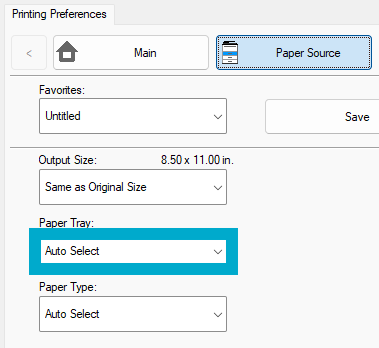](https://helpdesk.brynathyn.edu/uploads/images/gallery/2026-06/ZlJimage.png) 11. Choose the **Bypass Tray** option. [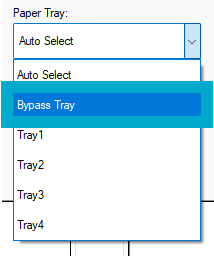](https://helpdesk.brynathyn.edu/uploads/images/gallery/2026-06/Vmoimage.png)For subsequent print jobs to the same printer, you will need to repeat steps **7-11** but instead set the paper tray to **Auto Select**. This will allow you to print normal pages without issue.
Your document can now be printed using the bypass tray!
# Secure Printing Secure printing allows you to set up a confidential/sensitive print job so that it won't print until you are physically at the copier. This prevents sensitive and protected information from being accessible to anyone else that uses the copier before you get to it. The two methods for secure printing are listed below. ## FindMe Printing to **FindMe** is secure by default, as the print job is not released anywhere until you scan your ID at a copier. See the page for [PaperCut](https://helpdesk.brynathyn.edu/books/printing/page/papercut "PaperCut") for instructions on how to set this method up for the first time. 1. Select **FindMe** to print to in whatever software you’re printing from. [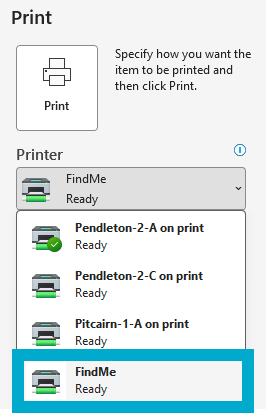](https://helpdesk.brynathyn.edu/uploads/images/gallery/2026-06/Vweimage.png) 2. After printing to **FindMe**, go to the copier that you'd like to print to, and scan your ID card to release the print there. 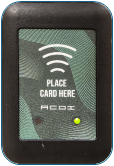 ## Web Printing If you don’t have PaperCut Print Deploy installed and you’re only planning on printing a few things securely, you can follow the **Web Printing** instructions in [Web Printing](https://helpdesk.brynathyn.edu/books/printing/page/web-printing "Web Printing"). This accomplishes the same thing as printing to **FindMe**. # Tust 1. Help 1. Tusting tusting 2. Help 1. Hello everyone ## HELLO MUNKUS. WELCOME TO AN ABNORMALLY AND UNNECESSARILY LONG LARGE HEADER. HE HE HE