Microsoft 365
- Installing Microsoft 365
- Setting up OneDrive
- Meeting on Teams
- Setting up Outlook on Mobile
- Encrypting Messages in Outlook
- Reporting Messages in Outlook
Installing Microsoft 365
All students, faculty and staff are assigned a license to the Microsoft 365 suite of apps.
- Microsoft 365 apps can be accessed via the web at m365.cloud.microsoft/apps.
- The desktop version of Microsoft 365 apps offer more features and can be installed with the instructions below.
Instructions
- Head to
Setting up OneDrive
Meeting on Teams
When scheduling a Teams meeting, you are given a variety of options. This page contains instructions for how to set up different kinds of Teams meetings.
Scheduling
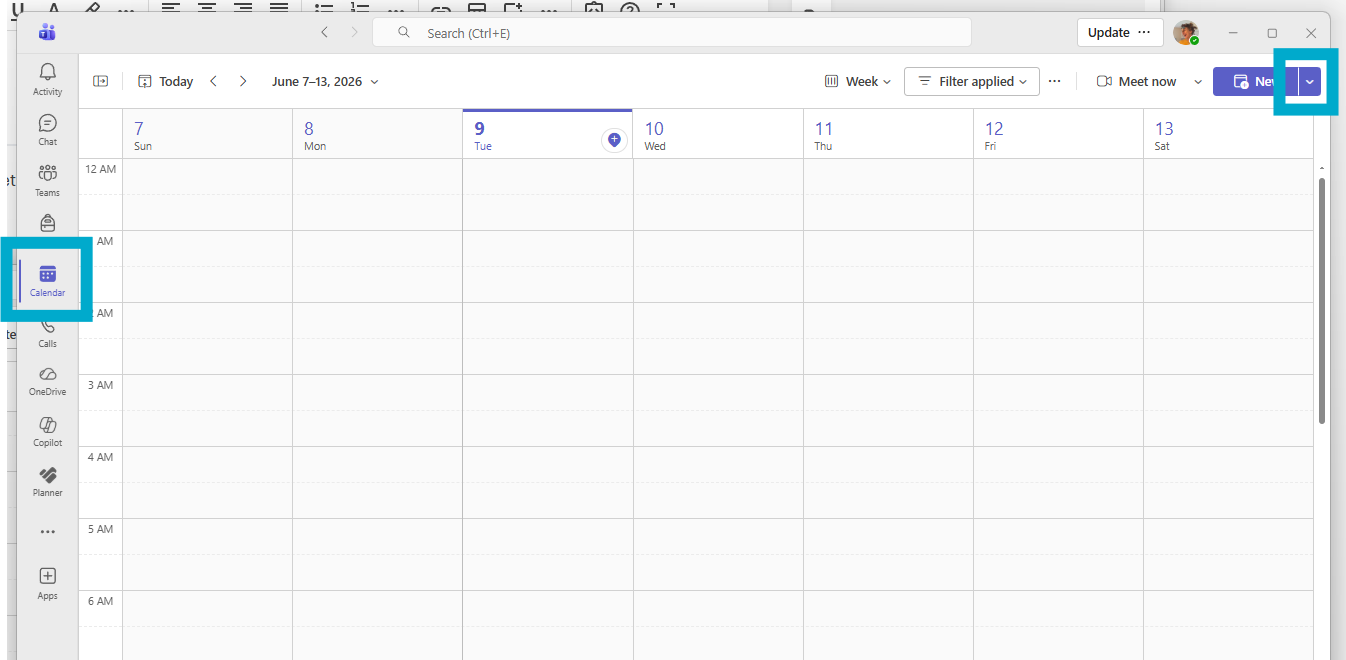
- Select the Calendar view.
- Select the drop-down arrow in the top right.

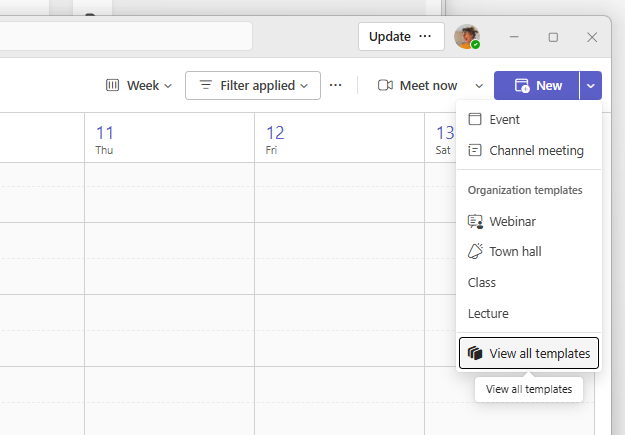
- Pick a template to use.

- View all templates will show the full list. Each is described in the section below.
- Fill in the rest of the basic information about the meeting (location, time, attendees, etc.), then send the invite.
Types
Channel Meeting
Choosing Channel meeting will create a basic Teams meeting where participants can discuss with each other. This is the best option for one-on-one or group conversations.
Live Event and Town Hall
Live Events and Town Halls support a massive number of viewers connecting to watch content live from the host. Viewer participation is under the control of meeting organizers for managed Q&A and similar interaction. These are best suited to public presentations. The main difference is that in Town Halls participants are strictly limited to no microphone or camera, whereas in Live Events input permissions can be changed.
Webinar
Webinars are similar to live events, but have advanced features both for pre-registering attendees, and for managing multiple presenters. This is ideal for when presenters are attending from multiple locations.
Lecture and Class
Lectures and Classes are very similar to meetings, but have a few additional options to limit which participants can present, use their mics, text chat, etc. The only difference between the two is that classes have chat set to only during the meeting, whereas lectures default to having the chat available outside the meeting.
Setting up Outlook on Mobile
If you forget your email address and/or password, see What is my Username and Password?
- Scan a QR code to download the Outlook app from the Apple App Store or Google Play Store.


- Tap Add Account.
- Enter your college email address.
- Select Office 365 as your account type or email provider.
- Enter your Microsoft account password, then click Sign in.
- Approve your sign in request via Authenticator when prompted.


You now have access to your college email on the go!
Encrypting Messages in Outlook
All students, faculty, and staff should have the ability to send encrypted emails. This page details how to encrypt your message and how to view an encrypted message in Outlook.
Background
Microsoft offers a few different levels of encryption. This is an outline of what the different levels do (all levels are securely encrypted):
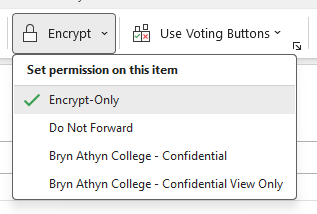
- Encrypt-Only is the default, it means the message is encrypted in transit and the recipient will have to authenticate with their email to view the message, or use a one-time code sent to their email to authenticate.
- Do Not Forward disables the forward option and disables printing. Of course, this doesn’t disable screenshots or the user’s ability to take a picture with their smartphone.
- Bryn Athyn College – Confidential means the recipient won’t be able to open the message in a non-Bryn Athyn College/GC Outlook client. This is in case someone is having their work email forwarded to a personal email.
- Bryn Athyn College – Confidential View Only is the same as above, only the content cannot be modified or replied to.
If you wish to send an encrypted message, we recommend setting up the encryption before writing your message. That way, if you accidentally send the message before you are done typing it, it will still be encrypted. Additionally, you can send this link from Microsoft that explains how end users can open a protected message: https://support.office.com/en-us/article/how-do-i-open-a-protected-message-1157a286-8ecc-4b1e-ac43-2a608fbf3098
Instructions
These instructions were created with the Outlook desktop app. If you're encrypting on the Outlook web version, the instructions remain the same, although the buttons may look slightly different.
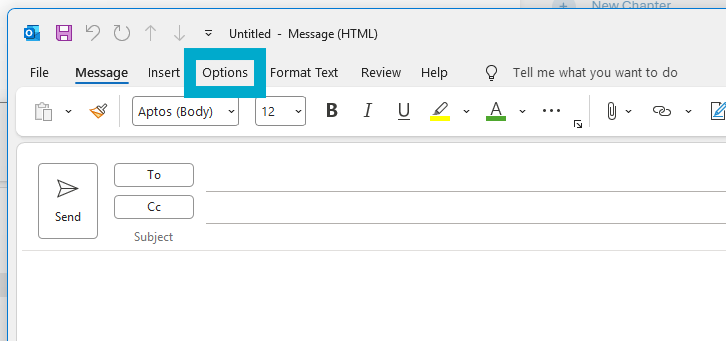
- Create a new email. In that email select the Options tab at the top.

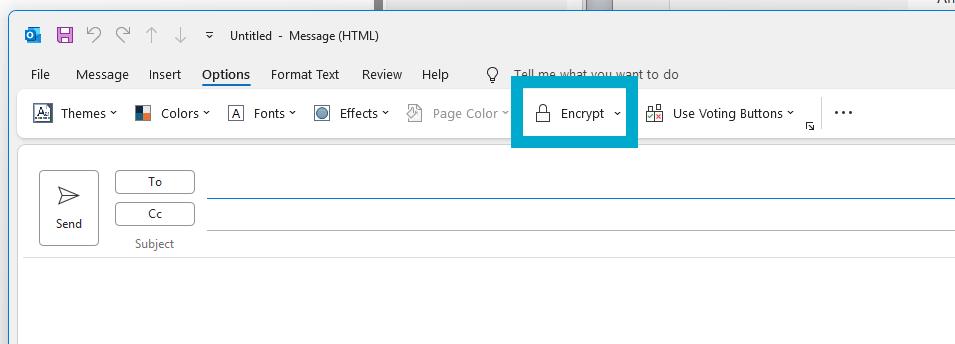
- Select Encrypt.

- Optionally, choose your encryption level from the drop-down menu.

You may have to click Encrypt first for the dropdown to appear correctly if this is your first time encrypting a message.
- Write and send your message!
Viewing
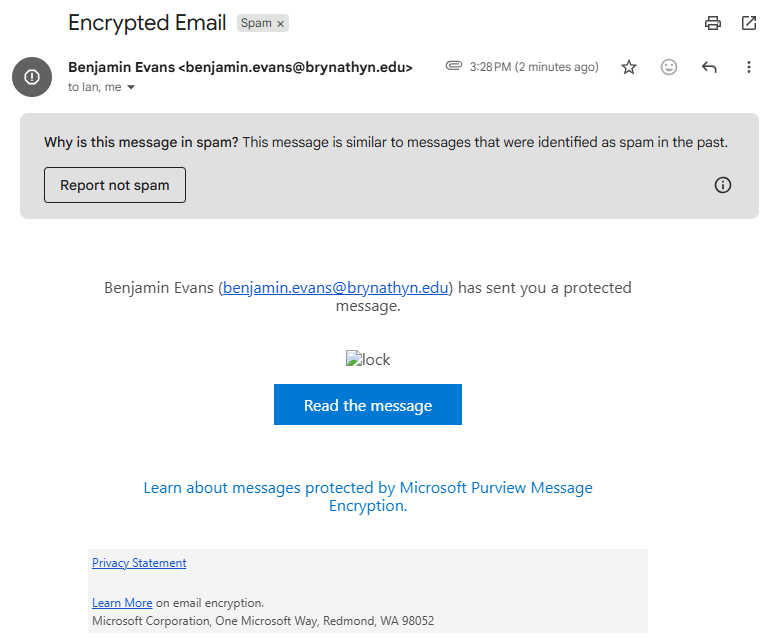
For anyone with a Bryn Athyn College email, viewing an encrypted email will be the same as opening any other email. If you’re sending an encrypted email to someone outside of Bryn Athyn College, like to a Gmail address, the recipient must go through the Microsoft Purview portal to read it:
- Locate the email.

When received, it may automatically go into the recipient's spam folder.
- Once the recipient clicks on Read the message, they will be taken to a login page.
- Here they can either log in with their personal email account (e.g.
<name>@gmail.com), or use the One-time passcode option to sign in.
- Here they can either log in with their personal email account (e.g.
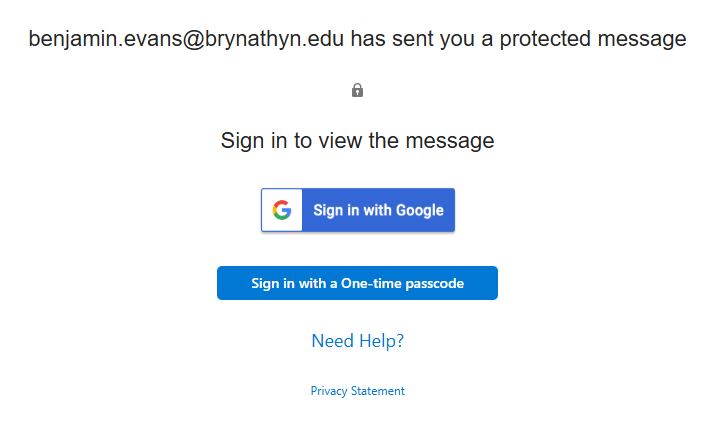
They will then be able to view the contents of the message.
Reporting Messages in Outlook
Use the Report Message drop down to select from a couple ways to deal with phishing or junk mail. These features help Microsoft keep your information safe and your inbox filled with only important emails.
Instructions
The screenshots below will match the Outlook website and the modern version of the desktop app. If you use the old version (Outlook Classic) on your desktop, the buttons may be in different locations.
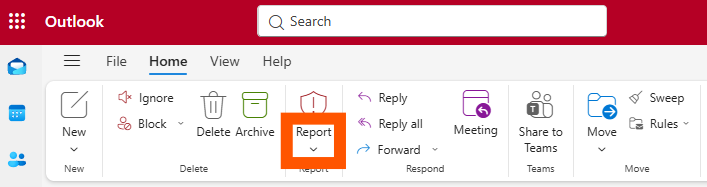
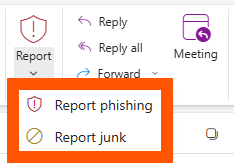
- In the Home tab, click the Report button with the dropdown arrow.

- With the message you want to report highlighted, click Report junk or Report Phishing. See Junk and Phishing at the bottom of this page if you don't know which to select.

- Click Report to confirm.

- The message will be moved to your Junk Email folder. After 30 days there, it will be deleted.
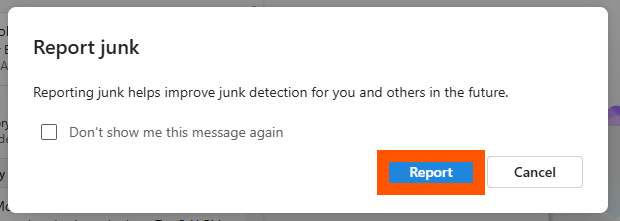
When you report a message, a copy will be sent to Microsoft to update spam filters, and all future messages from that sender will be sent directly to the Junk Email folder.
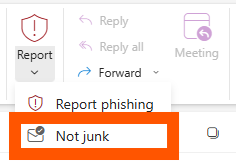
If you reported a message accidentally and wish to restore it:
- Find the message in your Junk Email folder and select it.
- Click the Report dropdown.
- Click Not junk.

Junk
These are messages that you don't want to receive. For example, they may be advertisements you don't care about or find offensive. Junk emails are annoying, but not necessarily malicious.
Phishing
Phishing is the practice of luring you into disclosing personal information, such as bank account numbers and passwords. Often phishing messages look legitimate but have deceptive links that open fake websites. Phishing emails are always malicious, but not necessarily annoying.